Membuat Absensi Online menggunakan NodeMCU dan modul RFID RC522


Absensi Online menggunakan NodeMCU dan modul RFID RC522


Prototype ini hampir sejenis dengan mesin absensi sederhana yang pernah dibahas pada post sebelumnya. Karena adanya teknologi wireless serta konsep IoT yang mudah dan praktis diimplementasikan maka aplikasi menggunakan board nodeMCU bisa menjadi opsi. Nah untuk memudahkan dalam ujicoba, akan saya sediakan sample sistem informasi (berbasis web) yang dapat dimanfaatkan untuk coba-coba. Saya tidak akan menjelaskan secara rinci terkait pembuatan sistem infomasinya jadi harap maklum. Pastikan kalian sudah memahami/belajar tentang pembuatan aplikasi berbasis web sebagai dasarnya.

flow

Konsep dari sistem absensi online dengan RFID kurang lebih akan seperti gambar diatas walaupun secara spesifik tidaklah sesimpel itu. Ini agak berbeda dari tutorial sebelumnya karena untuk memfasilitasi semua jenis kartu mifare classic (emoney, RFID tag, Sticker Tag) maka data yang akan diolah adalah uid saja (tidak ada proses write data). Reader RC522 akan membaca uid kemudian datanya diproses oleh NodeMCU untuk dikirim ke server (database). Nah dari proses pengiriman data ini, maka akan diperoleh response terkait dengan informasi dari uid hasil pembacaan (misal nama, status absensi, dll). Pengaturan informasi yang berkaitan dengan pengguna kartu dapat di atur dalam sistem informasi. Bagian yang paling penting adalah pembuatan Web API untuk menyediakan layanan penyimpanan data dan juga response. Biar lebih mudah dipahami, silahkan dipelajari tutorial pada post ini. Untuk mempermudah development maka percobaan dilakukan secara local. Pada dasarnya semua aplikasi yang dijalankan di localhost dapat di onlinekan dengan mengupload aplikasi tersebut ke hosting (lebih jelasnya dapat dipelajari sendiri). Ok langsung saja kita mulai proses pembuatan sistem Absensi menggunakan NodeMCU dan modul RFID RC522.


Alat dan Bahan

Hardware:
  • NodeMCU
  • RC522 - RFID module
  • I2C OLED 128x64
  • Buzzer
  • Kabel-kabel Jumper
Software:
  • Arduino IDE
  • Notepad ++ (text editor)
  • XAMPP (Saya pakai versi 7.4)
  • Postman (web API testing)

Membuat Web API

Pertama-tama mari kita siapkan terlebih dahulu Web APInya. Kita mulai dengan pembuatan database MySQL. Disini saya menyimpan data absen pada database absensi dengan 3 buah tabel didalamnya yaitu data_karyawan, data_absen, dan data_invalid. Tabel data_karyawan digunakan untuk menyimpan data umum dari karyawan (nama, alamat, divisi, dll), tabel data_absen digunakan untuk menyimpan data absensi seperti uid, tanggal, jam, status absensi. Sementara itu, untuk tabel data_invalid digunakan untuk meyimpan uid yang belum tersimpan pada data_karyawan atau bisa juga disebut sebagai log untuk hasil pembacaan kartu yang tidak valid (karena belum didaftarkan).
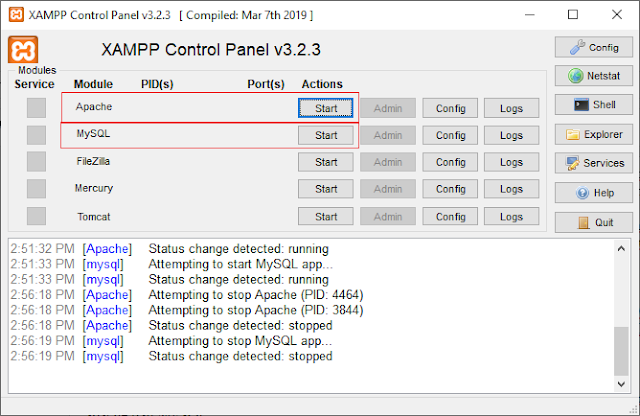
Buka Xampp dan jalankan service apache dan MySQL
xampp-Arduino-Mysql
Buka phpMyAdmin dan jalankan SQL berikut untuk membuat database yang diperlukan
CREATE DATABASE IF NOT EXISTS absensi;
USE absensi;

/*Table structure for table `data_absen` */
CREATE TABLE data_absen (
  id int(100) NOT NULL AUTO_INCREMENT,
  tanggal date NOT NULL DEFAULT current_timestamp(),
  waktu time NOT NULL DEFAULT current_timestamp(),
  uid varchar(20) NOT NULL,
  status varchar(20) NOT NULL,
  PRIMARY KEY (id)
);

/*Table structure for table `data_invalid` */
CREATE TABLE data_invalid (
  id int(100) NOT NULL AUTO_INCREMENT,
  tanggal date NOT NULL DEFAULT current_timestamp(),
  waktu time NOT NULL DEFAULT current_timestamp(),
  uid varchar(10) NOT NULL,
  status varchar(10) NOT NULL,
  PRIMARY KEY (id)
);

/*Table structure for table `data_karyawan` */
CREATE TABLE data_karyawan (
  id int(50) NOT NULL AUTO_INCREMENT,
  created date NOT NULL DEFAULT current_timestamp(),
  uid varchar(20) NOT NULL,
  nama varchar(50) NOT NULL,
  division varchar(50) NOT NULL,
  mail varchar(50) NOT NULL,
  alamat text NOT NULL,
  picture varchar(100) NOT NULL,
  PRIMARY KEY (id)
);
absensi_database
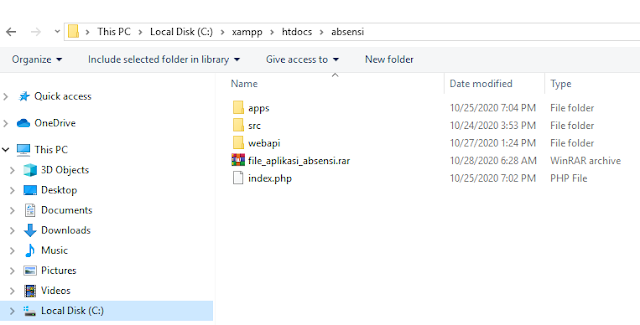
Setelah database siap lanjut ke directory httdocs (C:\xampp\htdocs). Buat folder absensi dan selanjutnya didalam folder absensi buat folder webapi. Terakhir dalam folder webapi buat folder  api, class dan config
absensi_dir
Selanjutnya masuk ke folder config (C:\xampp\htdocs\absensi\webapi\config), buat file database.php. Buka file dengan notepad ++ dan isi dengan code berikut. File database.php digunakan untuk melakukan koneksi ke database yang digunakan (absensi). Untuk username dan password silahkan disesuaikan.
database.php
<?php 
    class Database {
        private $host = "localhost";
        private $database_name = "absensi";
        private $username = "root";
        private $password = "";

        public $conn;

        public function getConnection(){
            $this->conn = null;
            try{
                $this->conn = new PDO("mysql:host=" . $this->host . ";dbname=" . $this->database_name, $this->username, $this->password);
                $this->conn->exec("set names utf8");
            }catch(PDOException $exception){
                echo "Database could not be connected: " . $exception->getMessage();
            }
            return $this->conn;
        }
    }  
?>
lanjut ke tahap selanjutnya masuk ke folder class (C:\xampp\htdocs\absensi\webapi\class). Buat file  absensi.php. File ini merupakan program untuk mengatur proses penyimpanan data yang dikirim melalui request GET. Alurnya adalah sebagai berikut
desain%2Bflow
Untuk program pada absensi.php , dapat dilihat pada kode dibawah
absensi.php
<?php
date_default_timezone_set('Asia/Jakarta');
class Absensi{
	// Connection
	private $conn;

	// Table
	private $db_table = "data_absen";
	private $db_table1 = "data_karyawan";
	private $db_table2 = "data_invalid";

	// Columns
	public $id;
	public $tanggal;
	public $waktu;
	public $uid;
	public $status;
	public $last_status;
	public $nama;

	// Db connection
	public function __construct($db){
		$this->conn = $db;
	}

	// CREATE
	public function createData(){
	//1. Cek user
		$sqlQuery = "SELECT * FROM ". $this->db_table1 ." WHERE uid = :uid LIMIT 0,1";
		$stmt = $this->conn->prepare($sqlQuery);
		$stmt->bindParam(":uid", $this->uid);
		$stmt->execute();
		if($stmt->errorCode() == 0) {
			while(($dataRow = $stmt->fetch(PDO::FETCH_ASSOC)) != false) {
				$this->nama = $dataRow['nama'];
			}
		} else {
			$errors = $stmt->errorInfo();
			echo($errors[2]);
		}
		$itemCount = $stmt->rowCount();
		
		if($itemCount > 0){
			//UID terdaftar -> cek status terakhir
			$sqlQuery = "SELECT data_absen.id, data_absen.uid, data_absen.status, data_karyawan.nama 
						FROM ". $this->db_table .", ". $this->db_table1 ."
						WHERE data_absen.id = (SELECT MAX(data_absen.id) 
						FROM ". $this->db_table ." WHERE data_absen.uid = :uid) 
						AND data_karyawan.uid= :uid";
			$stmt = $this->conn->prepare($sqlQuery);
			$stmt->bindParam(":uid", $this->uid);
			$stmt->execute();
			$itemCount = $stmt->rowCount();
			if($itemCount > 0){
				//error handling
				if($stmt->errorCode() == 0) {
					while(($dataRow = $stmt->fetch(PDO::FETCH_ASSOC)) != false) {
						$this->last_status = $dataRow['status'];
						$this->nama = $dataRow['nama'];
						//echo($this->last_status);
					}
				} else {
					$errors = $stmt->errorInfo();
					echo($errors[2]);
				}
			}else{
				$this->last_status ="OUT";
			}
			
			//set status
			if ($this->last_status == "IN"){
				$this->status = "OUT";
			}else{
				$this->status= "IN";
			}
			//Insert Data to data_absen	
			$sqlQuery = "INSERT INTO ". $this->db_table ."
					SET	waktu = :waktu, uid = :uid, status = :now_status";
						
			$this->waktu = date("H:i:s");
			
			$stmt = $this->conn->prepare($sqlQuery);
		
			// sanitize
			$this->uid=htmlspecialchars(strip_tags($this->uid));
		
			// bind data
			$stmt->bindParam(":uid", $this->uid);
			$stmt->bindParam(":now_status", $this->status);
			$stmt->bindParam(":waktu", $this->waktu);
		
			if($stmt->execute()){
			   return true;
			}
			return false;
		}
		else{
			//UID tidak terdaftar
			$this->status= "INVALID";
			$this->nama ="Invalid";
			
			//Insert Data to data_invalid	
			$sqlQuery = "INSERT INTO
						". $this->db_table2 ."
					SET
						waktu = :waktu,
						uid = :uid, 
						status = :now_status";
			$this->waktu = date("H:i:s");
			
			$stmt = $this->conn->prepare($sqlQuery);
		
			// sanitize
			$this->uid=htmlspecialchars(strip_tags($this->uid));
		
			// bind data
			$stmt->bindParam(":uid", $this->uid);
			$stmt->bindParam(":now_status", $this->status);
			$stmt->bindParam(":waktu", $this->waktu);
		
			if($stmt->execute()){
			   return true;
			}
			return false;
			
		}
		
	}
}
?>
Selanjutnya masuk ke folder api (C:\xampp\htdocs\absensi\webapi\api). File terakhir yang akan dibuat adalah create.php fungsinya digunakan sebagai penghubung dan pengoleksi data (dari proses GET) yang selanjutnya diproses ke fungsi createData() pada absensi.php. Setelah fungsi create data selesai maka akan memberikan response berupa json data dengan struktur sebagai berikut
{
    "waktu": "15:55:02",
    "nama": "Nama User",
    "uid": "B6B3C614",
    "status": "IN"
}
Untuk kode dari create.php dapat dicopas dibawah ini
create.php
<?php
header("Access-Control-Allow-Origin: *");
header("Content-Type: application/json; charset=UTF-8");

include_once '../config/database.php';
include_once '../class/absensi.php';

$database = new Database();
$db = $database->getConnection();

$item = new Absensi($db);
$item->uid = isset($_GET['uid']) ? $_GET['uid'] : die('wrong structure!');
	
if($item->createData()){
	// create array
	$data_arr = array(
		"waktu" => $item->waktu,
		"nama" => $item->nama,
		"uid" => $item->uid,
		"status" =>  $item->status
	);
	http_response_code(200);
	echo json_encode($data_arr);
} else{
	http_response_code(404);
	echo json_encode("Failed!");
}
?>
Ok program PHP Rest API udah selesai dibuat. untuk memastikan susunan dan lokasi foldernya adalah sebagai berikut:
file_tree
Setelah semuanya ok, mari kita test apakah web API dapat berfungsi dengan baik. Pengetesan dapat dilakukan via browser atau postman dengan mengakses url berikut:
http://localhost/absensi/webapi/api/create.php?uid=YOUR_UID_TAG
Apabila uid belum didaftarkan di tabel data_karyawan, maka akan diperoleh status invalid. Sementara bila uid sudah terdaftar maka akan diperoleh data nama dan status
data_karyawan
data karyawan (uid terdaftar)

invalid
uid tidak terdaftar sehingga masuk ke kategori invalid  (data disimpan di tabel data_invalid)

valid
uid terdaftar sehingga diperoleh data nama dan status (data disimpan di tabel data_absen)

Apabila tidak ada kendala, maka bagian Web API sudah selesai. Mari kita lanjut ke bagian hardwarenya!

Mesin Absensi NodeMCU + RC522

Wiring Diagram

Sesuai dengan alat dan bahan yang telah disebutkan sebelumnya, maka rangkaian mesin absensi online nodeMCU dapat dilihat pada gambar berikut
 
skematik

Program NodeMCU 

Terdapat beberapa library yang harus di install yaitu: MFRC522, Adafruit_GFX, Adafruit_SSD1306, dan ArduinoJson. Untuk versi library silahkan disesuaikan apabila terdapat error saat compile program.
adafruit_GFX
Adafruit_SSD1360
arduino_json
arducoding-absensi-nodemcu

Setelah library siap, langsung saja copas program dibawah ini. Sesuaikan wifi SSID, wifi Password, dan alamat server (atau IP komputer yang digunakan sebagai server)
#include <ESP8266WiFi.h>
#include <ESP8266HTTPClient.h>
#include <SPI.h>
#include <MFRC522.h>
#include <Adafruit_GFX.h>
#include <Adafruit_SSD1306.h>
#include <ArduinoJson.h>
#include "icon.h"
//inisialisasi OLED
#define SCREEN_WIDTH 128
#define SCREEN_HEIGHT 64
Adafruit_SSD1306 display(SCREEN_WIDTH, SCREEN_HEIGHT, &Wire);
#define RST_PIN 16
#define SS_PIN 0
byte buzzer = 2; //pin D0
MFRC522 mfrc522(SS_PIN, RST_PIN); // Create MFRC522 instance
const char* ssid = "Android_AP"; //Your Wifi SSID
const char* password = "rahasia"; //Wifi Password
String server_addr= "192.168.0.5"; //your server address or computer IP
byte readCard[4];
uint8_t successRead;
String UIDCard;
void setup() {
pinMode(buzzer, OUTPUT);
Serial.begin(115200); // Initialize serial communications with the PC
SPI.begin(); // Init SPI bus
mfrc522.PCD_Init(); // Init MFRC522 card
Serial.println(F("Read Uid data on a MIFARE PICC:")); //shows in serial that it is ready to read
ShowReaderDetails(); // Show details of PCD - MFRC522 Card Reader details
if(!display.begin(SSD1306_SWITCHCAPVCC, 0x3C)) {
Serial.println(F("SSD1306 allocation failed"));
for(;;);
}
// just intro
display.clearDisplay();
display.setTextColor(WHITE);
display.setTextSize(1);
display.setCursor(38,20); display.println(F("ARDUCODING"));
display.setCursor(35,35); display.println(F("Mesin Absen"));
display.display();
delay(1000);
ConnectWIFI();
delay(2000);
}
void loop() {
display.clearDisplay();
display.drawBitmap(32, 0, cardBitmap, 68, 50, WHITE);
display.setTextSize(1);
display.setCursor(30,55);display.print("Tap Your Card!");
display.display();
successRead = getID();
}
uint8_t getID() {
// Getting ready for Reading PICCs
if ( ! mfrc522.PICC_IsNewCardPresent()) {
return 0;
}
if ( ! mfrc522.PICC_ReadCardSerial()) {
return 0;
}
UIDCard ="";
Serial.println(F("Scanned PICC's UID:"));
for ( uint8_t i = 0; i < mfrc522.uid.size; i++) {
UIDCard += String(mfrc522.uid.uidByte[i], HEX);
}
UIDCard.toUpperCase(); //Capital
Serial.print("UID:");
Serial.println(UIDCard);
Serial.println(F("**End Reading**"));
digitalWrite(buzzer, HIGH);delay(200);
digitalWrite(buzzer, LOW);delay(200);
digitalWrite(buzzer, HIGH);delay(200);
digitalWrite(buzzer, LOW);
storeData(); //store data to DB
delay(2000);
mfrc522.PICC_HaltA(); // Stop reading
return 1;
}
void storeData(){
ConnectWIFI(); //check wifi connection
String address, massage, first_name;
//equate with your Server address (computer's IP address) and your directory application
address ="http://"+server_addr+"/absensi/webapi/api/create.php?uid="+UIDCard;
HTTPClient http;
http.begin(address);
int httpCode = http.GET(); //Send the GET request
String payload;
Serial.print("Response: ");
if (httpCode > 0) { //Check the returning code
payload = http.getString(); //Get the request response payload
payload.trim(); //remove \n character
if( payload.length() > 0 ){
Serial.println(payload + "\n");
}
}
http.end(); //Close connection
const size_t capacity = JSON_OBJECT_SIZE(4) + 70; //simulate your JSON data https://arduinojson.org/v6/assistant/
DynamicJsonDocument doc(capacity);
// Deserialize the JSON document
DeserializationError error = deserializeJson(doc, payload);
// Test if parsing succeeds.
if (error) {
Serial.print(F("deserializeJson() failed: "));
Serial.println(error.c_str());
return;
}
const char* waktu_res = doc["waktu"];
String nama_res = doc["nama"];
const char* uid_res = doc["uid"];
String status_res = doc["status"];
//char * first_name;
for(int i = 0; i < nama_res.length(); i++){
if(nama_res.charAt(i) == ' '){
first_name = nama_res.substring(0, i);
break;
}
}
display.clearDisplay();
display.drawBitmap(0, 5, userBitmap, 50, 60, WHITE);
display.setTextColor(WHITE);
display.setTextSize(1);
//Print Data
if (status_res == "INVALID"){
massage = "Who are you?";
display.setCursor(52,15);display.print(massage);
display.setCursor(52,30);display.print(uid_res);
display.setCursor(52,40);display.print(status_res);
}else{
if (status_res =="IN"){
massage = "Welcome!";
}
else{
massage = "See you!";
}
display.setCursor(52,15);display.print(massage);
display.setCursor(52,30);display.print(first_name);
display.setCursor(52,40);display.print(waktu_res);
}
display.display();
delay(3000);
}
void ConnectWIFI(){
if(WiFi.status() != WL_CONNECTED){
Serial.print("Attempting to connect to SSID: ");
Serial.println(ssid);
WiFi.begin(ssid, password);
int i=0;
int a=0;
while(WiFi.status() != WL_CONNECTED){
Serial.print(".");
display.clearDisplay();
display.setTextSize(1);
if (a==0){
display.drawBitmap(52, 20, wifi_icon, 16, 16, WHITE);
a=1;
}else{
display.drawBitmap(52, 20, wifi_icon, 16, 16, BLACK);
a=0;
}
display.setCursor(25,50);display.print("Connecting ...");
display.display();
delay(1000);
++i;
if (i==30){
i=0;
Serial.println("\n Failed to Connect.");
break;
}
}
Serial.println("\n Connected!");
display.clearDisplay();
display.setTextSize(1);
display.drawBitmap(52, 20, wifi_icon, 16, 16, WHITE);
display.setCursor(33,50);display.print("Connected!");
display.display();
delay(2000);
}
}
void ShowReaderDetails() {
// Get the MFRC522 software version
byte v = mfrc522.PCD_ReadRegister(mfrc522.VersionReg);
Serial.print(F("MFRC522 Software Version: 0x"));
Serial.print(v, HEX);
if (v == 0x91)
Serial.print(F(" = v1.0"));
else if (v == 0x92)
Serial.print(F(" = v2.0"));
else
Serial.print(F(" (unknown),probably a chinese clone?"));
Serial.println("");
// When 0x00 or 0xFF is returned, communication probably failed
if ((v == 0x00) || (v == 0xFF)) {
Serial.println(F("WARNING: Communication failure, is the MFRC522 properly connected?"));
Serial.println(F("SYSTEM HALTED: Check connections."));
while (true); // do not go further
}
}
Nah, karena ada tambahan icon buat visualisasi pada display OLED nya maka buat file header icon.h (new tab - ketik icon.h - Ok). copy kode berikut ke icon.h
// 'wifi-icon', 16x16px
const unsigned char wifi_icon [] PROGMEM = {
0x00, 0x00, 0x00, 0x00, 0x07, 0xe0, 0x1f, 0xf8, 0x7c, 0x3e, 0xe7, 0xe7, 0xdf, 0xfb, 0x39, 0x1c,
0x37, 0xec, 0x0f, 0xf0, 0x0f, 0xf0, 0x03, 0xc0, 0x03, 0xc0, 0x01, 0x80, 0x00, 0x00, 0x00, 0x00
};
// 'user_white', 50x60px
const unsigned char userBitmap [] PROGMEM = {
0x00, 0x00, 0x00, 0x00, 0x00, 0x00, 0x00, 0x00, 0x00, 0x00, 0x00, 0x00, 0x00, 0x00, 0x00, 0x00,
0x00, 0x00, 0x00, 0x00, 0x00, 0x00, 0x00, 0x00, 0x00, 0x00, 0x00, 0x00, 0x00, 0x00, 0x3f, 0xf0,
0x00, 0x00, 0x00, 0x00, 0x00, 0xff, 0xfc, 0x00, 0x00, 0x00, 0x00, 0x03, 0xff, 0xfe, 0x00, 0x00,
0x00, 0x00, 0x07, 0xff, 0xff, 0x00, 0x00, 0x00, 0x00, 0x0f, 0xff, 0xff, 0xe0, 0x00, 0x00, 0x00,
0x0f, 0xff, 0xff, 0xf0, 0x00, 0x00, 0x00, 0x1f, 0xff, 0xff, 0xf8, 0x00, 0x00, 0x00, 0x1f, 0xff,
0xff, 0xf8, 0x00, 0x00, 0x00, 0x3f, 0xff, 0xfc, 0xf8, 0x00, 0x00, 0x00, 0x3f, 0xff, 0xf8, 0xf8,
0x00, 0x00, 0x00, 0x3f, 0xff, 0xe0, 0xf8, 0x00, 0x00, 0x00, 0x3f, 0xff, 0x81, 0xf8, 0x00, 0x00,
0x00, 0x0f, 0xf0, 0x01, 0xf8, 0x00, 0x00, 0x00, 0x00, 0x00, 0x00, 0xf8, 0x00, 0x00, 0x00, 0x00,
0x00, 0x00, 0x38, 0x00, 0x00, 0x00, 0x00, 0x00, 0x00, 0x38, 0x00, 0x00, 0x00, 0x00, 0x00, 0x00,
0x38, 0x00, 0x00, 0x00, 0x06, 0x00, 0x00, 0x38, 0x00, 0x00, 0x00, 0x07, 0x00, 0x00, 0x38, 0x00,
0x00, 0x00, 0x07, 0x00, 0x00, 0x38, 0x00, 0x00, 0x00, 0x07, 0x00, 0x00, 0x38, 0x00, 0x00, 0x00,
0x07, 0x00, 0x00, 0x38, 0x00, 0x00, 0x00, 0x07, 0x80, 0x00, 0x78, 0x00, 0x00, 0x00, 0x03, 0x80,
0x00, 0xf0, 0x00, 0x00, 0x00, 0x03, 0xc0, 0x00, 0xf0, 0x00, 0x00, 0x00, 0x01, 0xe0, 0x03, 0xe0,
0x00, 0x00, 0x00, 0x00, 0xf8, 0x07, 0xc0, 0x00, 0x00, 0x00, 0x00, 0x7f, 0x3f, 0x80, 0x00, 0x00,
0x00, 0x00, 0x3f, 0xff, 0x00, 0x00, 0x00, 0x00, 0x00, 0x0f, 0xfc, 0x00, 0x00, 0x00, 0x00, 0x00,
0x01, 0xe0, 0x00, 0x00, 0x00, 0x00, 0x00, 0x00, 0x00, 0x00, 0x00, 0x00, 0x00, 0x00, 0x00, 0x00,
0x00, 0x00, 0x00, 0x00, 0x00, 0x07, 0xfc, 0x00, 0x00, 0x00, 0x00, 0x00, 0x7f, 0xff, 0x80, 0x00,
0x00, 0x00, 0x01, 0xff, 0xff, 0xe0, 0x00, 0x00, 0x00, 0x07, 0xf0, 0x03, 0xf8, 0x00, 0x00, 0x00,
0x1f, 0x80, 0x00, 0x7e, 0x00, 0x00, 0x00, 0x3e, 0x00, 0x00, 0x1f, 0x00, 0x00, 0x00, 0x7c, 0x00,
0x00, 0x0f, 0x80, 0x00, 0x00, 0xf8, 0x00, 0x00, 0x07, 0xc0, 0x00, 0x00, 0xf0, 0x00, 0x00, 0x03,
0xe0, 0x00, 0x01, 0xe0, 0x00, 0x00, 0x01, 0xe0, 0x00, 0x03, 0xc0, 0x00, 0x00, 0x00, 0xf0, 0x00,
0x03, 0x80, 0x00, 0x00, 0x00, 0x70, 0x00, 0x03, 0x80, 0x00, 0x00, 0x00, 0x70, 0x00, 0x00, 0x00,
0x00, 0x00, 0x00, 0x00, 0x00, 0x00, 0x00, 0x00, 0x00, 0x00, 0x00, 0x00, 0x00, 0x00, 0x00, 0x00,
0x00, 0x00, 0x00, 0x00
};
// 'Card_icon', 68x50px
const unsigned char cardBitmap [] PROGMEM = {
0x00, 0x00, 0x00, 0x00, 0x00, 0x00, 0x00, 0x00, 0x00, 0x00, 0x00, 0x00, 0x00, 0x00, 0x00, 0x01,
0xc0, 0x00, 0x00, 0x00, 0x00, 0x00, 0x00, 0x00, 0x7f, 0xf0, 0x00, 0x00, 0x00, 0x00, 0x00, 0x00,
0x0f, 0xff, 0x78, 0x00, 0x00, 0x00, 0x00, 0x00, 0x03, 0xff, 0xc0, 0x18, 0x00, 0x00, 0x00, 0x00,
0x00, 0xff, 0xf0, 0x00, 0x18, 0x00, 0x00, 0x00, 0x00, 0x1f, 0xfe, 0x00, 0x00, 0x1c, 0x00, 0x00,
0x00, 0x07, 0xff, 0xc0, 0x00, 0x00, 0x0c, 0x00, 0x00, 0x01, 0xff, 0xe0, 0x00, 0x00, 0x00, 0x0c,
0x00, 0x00, 0x3f, 0xfc, 0x00, 0x00, 0x00, 0x00, 0x0c, 0x00, 0x07, 0xff, 0xc0, 0x00, 0x00, 0x00,
0x00, 0x0c, 0x00, 0x3f, 0xe0, 0x00, 0x00, 0x00, 0x00, 0x00, 0x0e, 0x00, 0x38, 0x00, 0x00, 0x00,
0x00, 0x00, 0x00, 0x06, 0x00, 0x70, 0x00, 0x00, 0x00, 0x00, 0x01, 0xc0, 0x06, 0x00, 0x60, 0x00,
0x00, 0x00, 0x00, 0x0f, 0xf0, 0x06, 0x00, 0x60, 0x00, 0x00, 0x00, 0x00, 0x1f, 0xf8, 0x06, 0x00,
0x60, 0x00, 0x00, 0x00, 0x00, 0x3f, 0xfc, 0x06, 0x00, 0x70, 0x00, 0x00, 0x00, 0x00, 0x3f, 0x9c,
0x07, 0x00, 0x30, 0x00, 0x00, 0x00, 0x00, 0x38, 0x0e, 0x07, 0x00, 0x30, 0x00, 0x00, 0x00, 0x00,
0x38, 0x4e, 0x03, 0x00, 0x30, 0x00, 0x00, 0x00, 0x00, 0x38, 0x0e, 0x03, 0x00, 0x30, 0x00, 0x20,
0x00, 0x00, 0x38, 0x0e, 0x03, 0x00, 0x30, 0x07, 0xf0, 0x00, 0x00, 0x38, 0x0e, 0x03, 0x00, 0x38,
0x1f, 0xf0, 0x00, 0x00, 0x3c, 0x1e, 0x03, 0x80, 0x18, 0x1f, 0xf0, 0x00, 0x00, 0x3e, 0x1e, 0x01,
0x80, 0x18, 0x1f, 0xf0, 0x00, 0x00, 0x1f, 0x01, 0x01, 0x80, 0x18, 0x1f, 0xf8, 0x00, 0x00, 0x1c,
0x01, 0xc1, 0x80, 0x18, 0x1f, 0xf8, 0x00, 0x00, 0x10, 0x03, 0xc1, 0x80, 0x18, 0x0f, 0xf8, 0x00,
0x00, 0x38, 0x07, 0xc1, 0xc0, 0x0c, 0x0f, 0xc0, 0x00, 0x00, 0x3c, 0x1f, 0xc0, 0xc0, 0x0c, 0x00,
0x00, 0x00, 0x00, 0x3f, 0xff, 0x00, 0xc0, 0x0c, 0x00, 0x00, 0x00, 0x00, 0x3f, 0xf8, 0x00, 0xc0,
0x0c, 0x00, 0x00, 0x00, 0x00, 0x1f, 0x00, 0x00, 0xc0, 0x0c, 0x00, 0x00, 0x1f, 0xe0, 0x00, 0x00,
0x00, 0xe0, 0x0e, 0x00, 0x03, 0xff, 0xc0, 0x00, 0x00, 0x00, 0xe0, 0x06, 0x00, 0x3f, 0xfc, 0x00,
0x00, 0x00, 0x00, 0xe0, 0x06, 0x03, 0xfe, 0x00, 0x00, 0x00, 0x00, 0x00, 0xc0, 0x06, 0x03, 0xc0,
0x00, 0x00, 0x00, 0x00, 0x0f, 0xc0, 0x06, 0x00, 0x00, 0x00, 0x00, 0x00, 0x01, 0xff, 0x80, 0x07,
0x00, 0x00, 0x00, 0x00, 0x00, 0x7f, 0xf8, 0x00, 0x07, 0x00, 0x00, 0x00, 0x00, 0x1f, 0xfe, 0x00,
0x00, 0x03, 0x00, 0x00, 0x00, 0x03, 0xff, 0xc0, 0x00, 0x00, 0x03, 0x00, 0x00, 0x00, 0xff, 0xf8,
0x00, 0x00, 0x00, 0x03, 0x00, 0x00, 0x3f, 0xfe, 0x00, 0x00, 0x00, 0x00, 0x03, 0x00, 0x07, 0xff,
0xc0, 0x00, 0x00, 0x00, 0x00, 0x03, 0x80, 0xff, 0xf0, 0x00, 0x00, 0x00, 0x00, 0x00, 0x01, 0xff,
0xfc, 0x00, 0x00, 0x00, 0x00, 0x00, 0x00, 0x00, 0xff, 0x80, 0x00, 0x00, 0x00, 0x00, 0x00, 0x00,
0x00, 0x00, 0x00, 0x00, 0x00, 0x00, 0x00, 0x00, 0x00, 0x00, 0x00, 0x00, 0x00, 0x00, 0x00, 0x00,
0x00, 0x00
};
view rawicon.h hosted with ❤ by GitHub
Program telah siap. Cus langsung upload ke nodeMCU dan mari lanjut ke tahap pengetesan.

Let's test

Berikut gambaran dari hasil pembacaan kartu, proses pengiriman data - pembacaan respon, dan penyimpanan data kedatabase. Oh iya, kalau lihat di youtube-youtube, reader RC522 dapat digunakan untuk membaca uid eKTP. Namun untuk reader RC522 yang saya gunakan kebetulan tidak dapat membaca uid eKTP.
hardware1
card_test-nodemcu-absensi
result
*just info: setelah dicek eKTP saya jenisnya MIFARE DESFire. menurut info dari si empunya library MFRC522, kartu MIFARE DESFire memang tidak dapat dibaca menggunakan reader ini.

Nah.. apabila data-data tersebut di tampilkan melalui sistem informasi (berbasis web)  kurang lebih seperti gambar berikut:
siste-informasi-mantab-absensi

Add some Custumization

Untuk memudahkan proses pendaftaran uid dan melihat rekapitulasi absensi maka kita dapat menggunakan sebuah dashboard. Dasar dari sistem aplikasi web yang digunakan pada dashboard adalah CRUD. Disini saya menggunakan pemrograman PHP untuk pembuatan CRUD ini. Biar mudah prosesnya pembuatannya saya menggunakan Crudiy ( https://github.com/jan-vandenberg/cruddiy).

Download file dashboard diatas kemudian ekstrak di folder absensi (C:\xampp\htdocs\absensi)
arducoding-sistem-absensi-online
Selanjutnya silahkan akses http://localhost/absensi maka akan tampil halaman dashboard dari sistem yang telah dibuat. Dashboard ini bersifat demo, jadi silahkan di modif-modif sendiri sesuai kebutuhan. 
arducoding-dashboard-absensi
arducoding-sistem-absensi-nodemcu

Apabila ingin versi fullnya (seperti di web demo dibawah), dapat menghubungi saya via email : thecroser@gmail.com. Just buy me a coffe for that 

Make it Online!

Untuk membuat agar service Web API dapat diakses secara online, kita memerlukan web hosting. Upload program API yang telah dibuat serta konfigurasi database yang ada di web hosting. Sebagai contoh dapat dicoba melalui URL berikut
http://sissen.000webhostapp.com/webapi/api/create.php?uid=CARD_UID    //[GET]Proses Absensi
http://sissen.000webhostapp.com/webapi/api/get_last.php?uid=CARD_UID  //[GET] Cek Tap kartu terakhir
*pada program nodmcu, silahkan ubah bagian String server_addr= "192.168.0.5"
menjadi String server_addr= "sissen.000webhostapp.com";

Nah untuk mengeceknya silahkan buka web demonya di https://sissen.000webhostapp.com/ . Untuk masuk ke halaman dahboard silahkan login terlebih dahulu dengan username: arducoding dan passwordnya: rahasiadong

Kesimpulan

Project ini masih bersifat dasar dan memiliki fitur yang sederhana. Masih terdapat beberapa Error handling yang perlu dibuat / diperbaharui baik dari segi program nodemcu ataupun program web API nya, dari segi keamanan penggunaan kartu, dan dari segi yang lainnya. Sementara dari sisi user interface, diperlukan metode yang cocok sehingga dapat menampilkan data yang diperlukan dengan baik. Silahkan untuk diskusi terkait projek ini agar lebih bermanfaat bagi siapapun yang membutuhkan.
Dalam kesempatan selanjutnya, akan saya coba bahas untuk pembuatan Sistem Informasi berbasis web yang fokus pada pengolahan data (CRUD) menggunakan pemrograman php native (ane gak jago pemrograman web, hanya sebatas tahu)


Keyword:


Komentar